torsdag 1. mai 2014

Got worbla scraps?

I have a lot of worbla scraps and leftovers that I don't really know what to do with. Ofc you can shape it into spikes and skull details for you armour, and some ever make new sheets from it. But I'm going to show you how you can make geeky little gifts for your friends! It's quick, easy and fun!

I'm doing a GIVE AWAY for one of these Inquisition buttons on my facebook page, from May 1st to 9th. Anyone can enter! Join the Inquisition!

Fist you are going to need some buttons. I use leftover ones from work. Then gather your worbla scraps and start shaping it into the patters you want. Because of all the Dragon Age Inquisition updates from Bioware lately, I've opted for some Inquisition logo styles. If the worbla won't stick to the button once it's cooled down, just glue it down with some contact glue.


When you have your base done, it's just to prime with woodglue. Some people prefer to use gesso, but for something quick like this I just add three layser of woodglue. After that it all dry it's just to pick you colors and paint! I use normal acrylic paints. And for a more beaten up look I like to weather my pieces. Here I simple paint on some black in the noocks and cranies and whipe it off with a paper towel. Leaving some paint for a dirt like effects. You can ofc go over with more brown tones for a rusty look.


You could just clearcoat them now and be happy, but I'm going about this is typical Dragon Age style. Blood, blood and more blood! >D I like to use Skin Illustrator alcoholic paints in blood tones for this, but normal acrylic paints should do the trick.
Then just a coat of clear lacker and you done! Neat little geek accessories for you and your friends! And an easy way to get allies for the Inquisition ;) 


Hope you like them!
- Karin Olava


TURORIAL - silicone mould

After some request I'm going to do a quick tutorial on one way to make a silicone mould. This is one I made spring of 2013 to be used for casting silicone applications, but the method can be transfered to casting in solid materials like polyurethane.

This is the design I worked of:
image
When making a silicone mould like this you first need a positive to sculpt on. Here I have my friend Sara's face in fiberglass and the first staged in the sculpting process.
image
Second I have the finished sculpt of the design I want casted. Ready with added flash edge. Both the flashedge and the pipes are there to have a whole through the silicone into the base, so when I make the plaster "cape" over later I will have some points to stabelise the negative and positive when I finally make a casting.
image
I use a pretty hard silicone, Elastosil M 4644, for this.
First i make a this layer carefully over the entire sculpture. Making sure to get ever detail covered.
image
When that layer has cured I build up a second 2cm layer. Let it cure over night.
image
Then it's just to make a to part stabelising plaster "cape". Like I mentioned before I build the plaster up with glassfiber to make it a bit more rigid.
image
image
Now it's just to clean out the mould and you should be good to go ^^
image
As I said I used this as a two-part mould to cast a silicone application, but I could use the silicone part to cast a hard polyurethane piece. The technique is the same :)

image
Finished makeup:

Makeup+applications+photoimage
by me, Karin Olava FX
Model: Sara from Sara & While's costume closet

The Inquisitor Helmet, Dragon Age Inquisition - WIP


image
"Darkness closes in.. will you stand against it?.. or leave this world to it's bitter end?"
Yep.. I am horrible at taking progress pictures, but I'm getting better, I think/hope? But anyway.. going to show a photo dump of the few progress pictures I tok with some small notes. Hopefully it will show some of the thought behind it.

This is the helmet for The Inquisitor costume based on the protagonist from Biowares new game Dragon age Inquisition. Will also partner up with the lovely Chrix Design as Morrigan :)

image
  • I actually made a pattern for this first, but sadly tossed it away right after I drew it on the foam and worbla. But this more or less how I make most of my Inquisitor armor parts. 
  • Then its just to make the 6 worbla-foam-worbla pieces, fuse them together and work on the shape.
image
  • all done and ready for priming. Made the base for the helmet out if wood glue and news paper and added worbla over. 
  • the dragon head I sculpted out of super sculpey, baked and glued on.
image
  • primed and painted. Just missing a clear coat. Might add some blood, but a bit unsure still...

The Making of my Destiny Hunter Mask

A few have asked me how I made the mask/helmet for my hunter. Didn't take that many pictures during the build process, but I'll post what I have and hopefully it will make sense.

First of I started with a visor. Mine is just a simple visor for a motorcycle helmet found on ebay. Then I just marked the shape and dremeled it out.
You can ofcourse just use visors made for snow goggles instead.
image
Then I started adding layers of foam as padding for the nose. From here if you have a headcast to work on the next steps should be fairly simple. Just adding layers of worbla.
image
If you have only your own head, then just take your time to make sure everything sits correctly on and use a mirror to look.

To build it out a bit on the top I used some foam, as the hood will hide this anyway. Also added a tube I got at Clas Ohlson, but you should be able to get something like it at any hardware store, and some rings for the fastning. Then several coats of gesso and some sanding before painting.

image
Finished product with the reference.
image
Hope you like it. I'm atleast looking very much forward to wear this at upcoming conventions!

Worbla: www.coscraft.co.uk
Visor: ebay
Tube: any/most hardware stores

Cosplay - Commander Shepard, Mass Effect

image
image
image
image
image
image
image
My lovely asari LI/squadmate Christina Erring, www.facebook.com/Chrixdesignandprops

M6 Carnifest & M11 Surpressor by Orion www.facebook.com/orionworks

TUTORIAL - basic two part mould

Just a quick, and hopefully easy to understand, tutorial on how to make a basic two-part plaster mould.

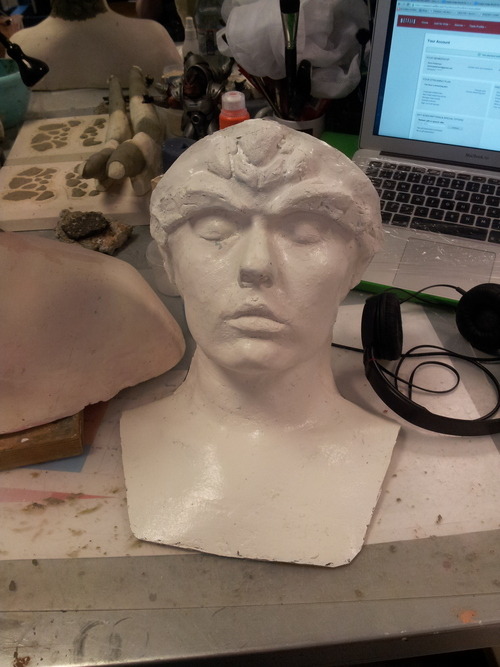
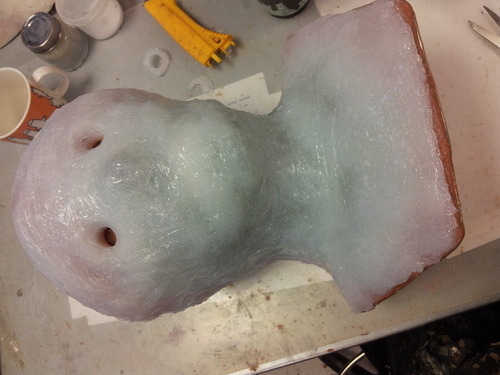
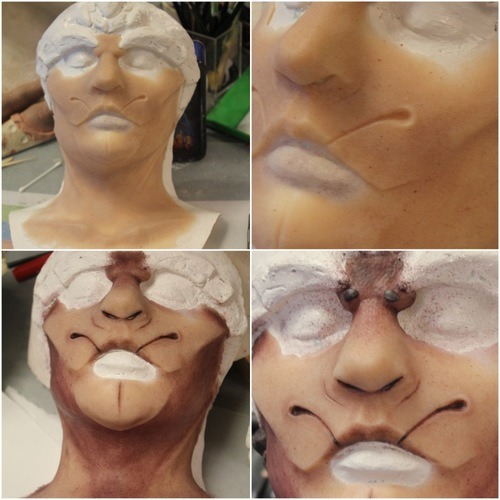
First you start with a positive. This is the part you sculpt on. Could either be a cast of your face, chest, arms.. pretty much anything.
image
!! With a mould type like this there is one very important thing to keep in mind, undercuts. The positive needs to go either straight down or out, if not the negative you make over it will lock on. Making the mould very difficult to impossible to take apart !! 
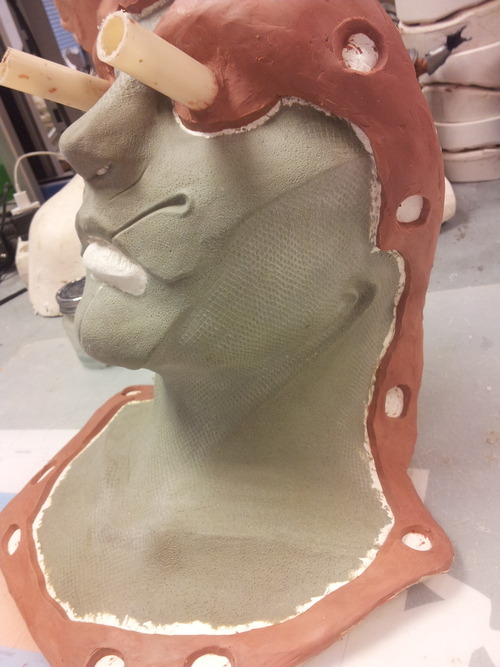
So now you have a finished sculpted piece and start preparing for the next step, adding a flashedge. This is added to make leftover casting material to "escape" and will make the edges on your finished product thinner.
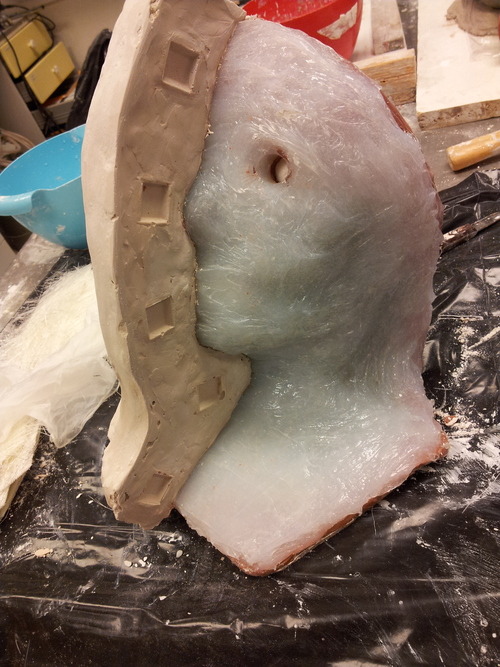
"Keyholes" are also cut out in the flashedge to stabilize to to parts and make a snug fit.
Second picture is of a different project, but the method is the same.

image
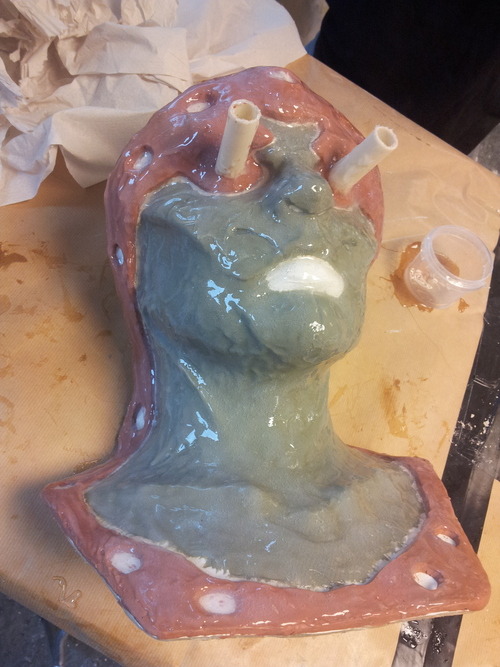
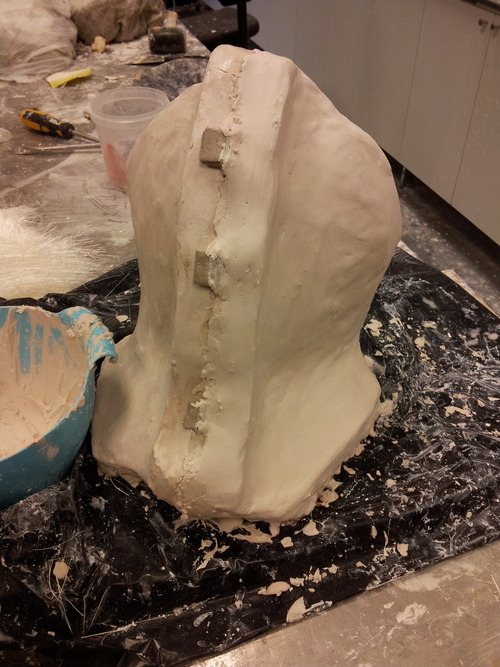
I sadly have no picture of the plaster application. (very hard and messy to take pictures while your hands are covered in plaster). First you add a thing layer of vaseline where the wet plaster meet the dry plaster. Or else it might get stuck together.
But just like with the lifecast, this goes for the positive aswell, start off with a spashcoat to get all the details.  The go inn with layers of fiberglass "fabric" together with the plasters in two layers. After that you add plaster till you get a thickness of about 1 inch (2,5cm). At the end you just add a but of plaster to make a nice, smooth and pretty mould :)
Between each layer you should also wait till the plaster is semi dried (when it looks more dull and not glossy) before adding the next.

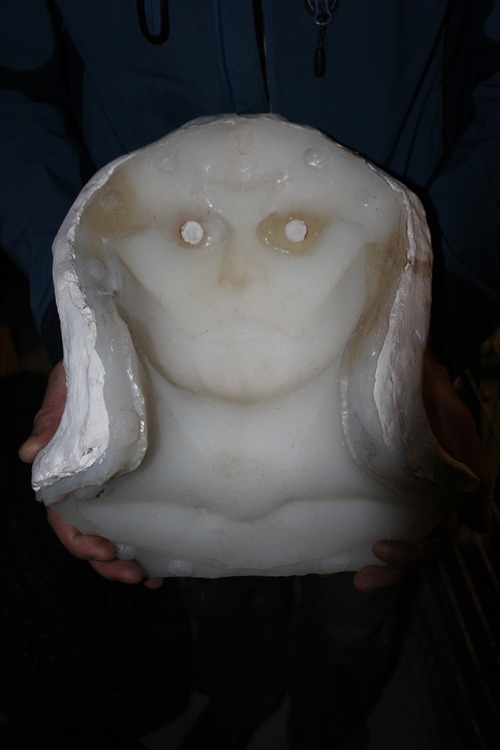
Wait till it dries. I like to wait over night. And carefully open the mould, clean it and it should look something like this! :)
image
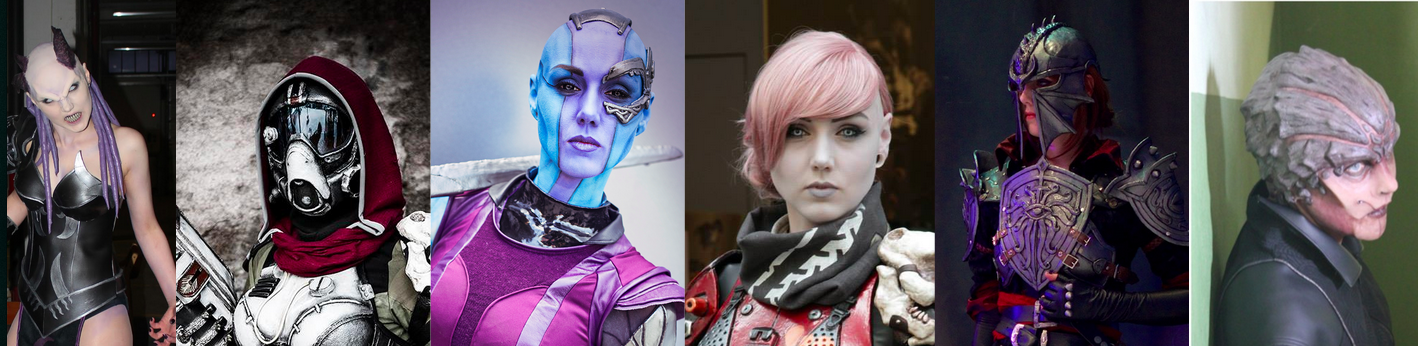
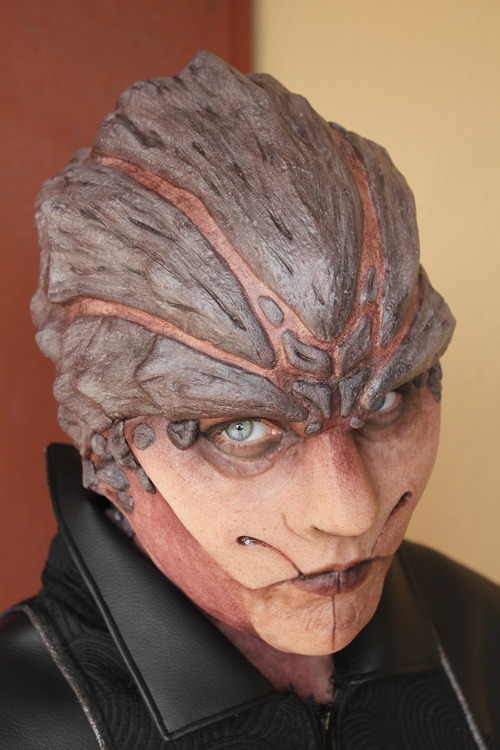
So, not you can cast several copies! You can either cast in gelantine, foam latex, silicone...
Keep in mind to to use latex and silicone in separate moulds as the two materials are not very friendly and it will ruin your mould.
image
This is a foam latex casting shown above.
I hope this inspires or motivates you to try something like this yourself. ANd as always, got any questions, just ask!
- Karin Olava
Feel the Space Magic!

TUTORIAL - LIFECAST

This can be done in different ways and with different materials. But I like this when it comes to material cost and it works for me.
!!! I want to stress that you should always be at least two people when doing a lifecast on someone. Also some might find the experience very claustrofobic and scary, so take care of your model. Explain the process beforehand and never EVER leave the model alone inside a cast while it dries! Also if you yourself is the model, let the sfx artist know if you are worried about anything, don't play brave. Nothings funny about feeling like your suffocating. !!!
And now to the fun!
I started with applying a boldcap to Sara and had her hair stick out because I wanted as normal a head shape as possible. The ponytail was convered. Also I chose to have her ears inside the cap because that is how it will sit once I apply the makeup as the character I designed won't have visible ear/earwholes. You can also leave the ears out should you wish.
After the cap was on I gave her a very lovely plastic bag dress to cover her up and get her shoulders bare. Then made a mark to seperate the font and back piece of the mould. Also rubbed some vaseline on her brows and eyelashes to get them not to stick to the alginate later, and also some on her back. Make sure your model sits comfortably and straight once you start.
I started with the back, laying down plaster bandages in 4x layers to cover the back. and made it a little bit thicker around the edge. The ponytail sticks out here.
Once that dries, put vaseline on the edge where plaster will meet plaster. After I plasted a strip with plaster bandages in 4x strip over her chest. Then it comes down to mixing up a batch with alginate again. I use about 1500g for this and enough water to get the right consistency. Aglinate only have about 4min working time, so work fast. I like to start applying it around the nose and mouth first so is case the model panics she can still see and hear fine. So I asked Sara to breathe in and hold it while I put alginate over her nose, then asked her to blow out of her nose hard and cleaned up around her nostrils. making sure she could breathe fine the rest was applied. Always have a person to make sure the models airways are open till the alginate dries completely.
When the alginate was dried it was just to cover ut up with plaster bandages in layers of 4.
image
It was about 15 min or so for everything to be dry enough to be taken off. Start with the front and gently work the front and back apart and then take off the front. Should be pretty easy. A good tip is also to have your model close here eyes as it might be very bright after having your eyes closed in the dark for that long. Then take the back off. This might sting a bit as the plaster sticks a bit to the skin. (of you have a hairy back, consider yourself now waxed).

To fill the lifecast you first put some paster to cover up the wholes for the nose and ponytail, then fill in the nostrils with some alginate. I use dental alginate here because is dries faster. Coat the inside where it's plaster like the back part with vaseline so the plaster won't stick together. Then it just to put the two parts together and start filling.
The mould should be hollow, so start with a splash coat of plaster first to get all the detail. When that has almost dried, fill the mould with fiberglass mats that you coat in plaster. Build this up in two layers and then just use plaster to build up the tickness to about 2-3cm.
After about a day or two you can upen the mould and there you go. A "replica" plaster head! ^^

Where to get the materials used in Norway:
Wilh. Willumsen, 97 10 21 20 www.willumsen.no
- Alginate
- plaster bandages
- they also sell some plaster
Wald. Ellefsen, 22 74 32 32, www.we.no
- different types of plaster

And as always if you have any questions, or if anything of this was unclear, I will be happy to answer them :)

- Karin Olava